Goofys - AWS S3 마운트 하기
12 Aug 2021aws의 서비스를 이용하면서 S3는 대부분이 이용을 할꺼라고 생각이된다. S3를 사용하던 중 가장 불편했던 것중 하나가 local PC에 마운트를 하는것이었다. 오늘은 s3를 local PC에 마운트 하는 방법을 포스팅 해보겠다.
그중 어떤걸 선택할까 고민하다가 goofys를 사용하게되었다.
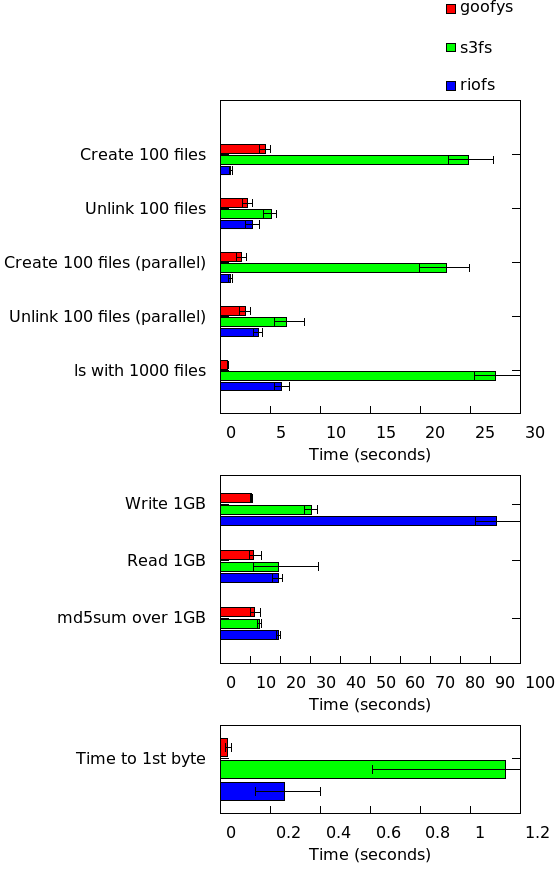
goofys 성능 비교
s3를 local pc에 마운트 하는 대표적인 서비스는 s3fs, s3fuse 와 goofys다. 아래는 goofys와 다른 서비스들간의 성능 비교다. 내가 goofys를 선택한 가장 큰 이유는 속도 차이가 다른 서비스에 비해 월등히 높기 때문이다.
goofys 설치 방법
go 언어와 fuse설치
$ sudo apt install golang fuse -y
$ mkdir $HOME/go
$ export GOPATH=$HOME/go
$ go get github.com/kahing/goofys
만약
# github.com/kahing/goofys/api/common
go/src/github.com/kahing/goofys/api/common/conf_azure.go:272:34: accountsRes.Value undefined (type storage.AccountListResultPage has no field or method Value)
go/src/github.com/kahing/goofys/api/common/conf_azure.go:373:35: not enough arguments in call to client.ListKeys
	have (context.Context, string, string)
	want (context.Context, string, string, storage.ListKeyExpand)
이런 에러가 발생이 된다면 github 프로젝트를 다운로드할 디렉토리가 없어서 그런것이다. github 프로젝트를 다운로드 할 디렉토리를 생성한다.
$ mkdir -p $HOME/go/src/github.com/kahing
$ cd $HOME/go/src/github.com/kahing/
$ git clone https://github.com/kahing/goofys.git
goofys를 install 한다.
$ go install $HOME/go/src/github.com/kahing/goofys
$ PATH=$PATH:$HOME/go/bin; export PATH
$ goofys --version
aws 권한 설정
Local PC의 폴더와 S3를 마운트 시키려면 aws 계정이 S3에 접근 할 수 있는 권한이 필요하다.이 방법이 이미 되어있다면 PASS!
AWS IAM 접속 후 AmazonS3FullAccess 권한을 부여
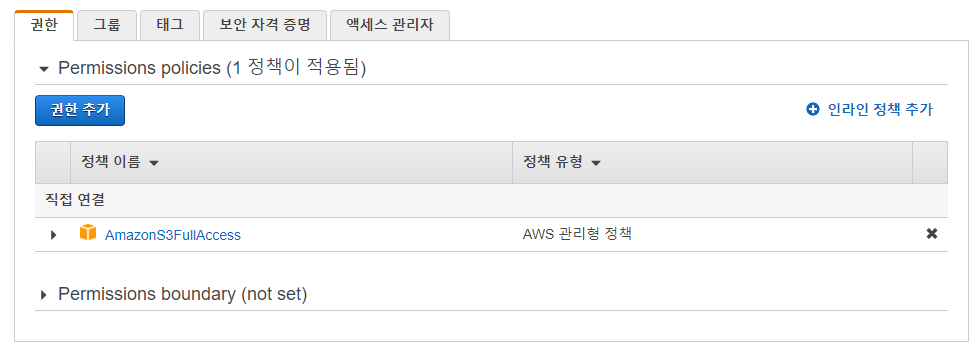
이후 해당 계정의 엑세스키와 시크릿 키를 ~/.aws/credentials안에 쓰고 저장한다.
$ cat ~/.aws/credentials
[default]
aws_access_key_id = AKID1234567890
aws_secret_access_key = MY-SECRET-KEY
AWS CLI를 통해서도 가능하다.
Goofys를 이용하여 S3를 local PC에 마운트
- bucket aws의 버킷 명
- mountpoint 별도 local pc에 마운트할 폴더(마운트할 폴더가 없으면 새로 폴더를 생성해야된다.)
$ goofys <bucket> <mountpoint>
참고로 PC를 재부팅을 하면 마운트를 다시 해야된다. 재부팅시에도 자동으로 마운트되게 하려면 bashrc를 이용해서 연결하는 방법을 추천한다.